How to Set Up Dictation on Android

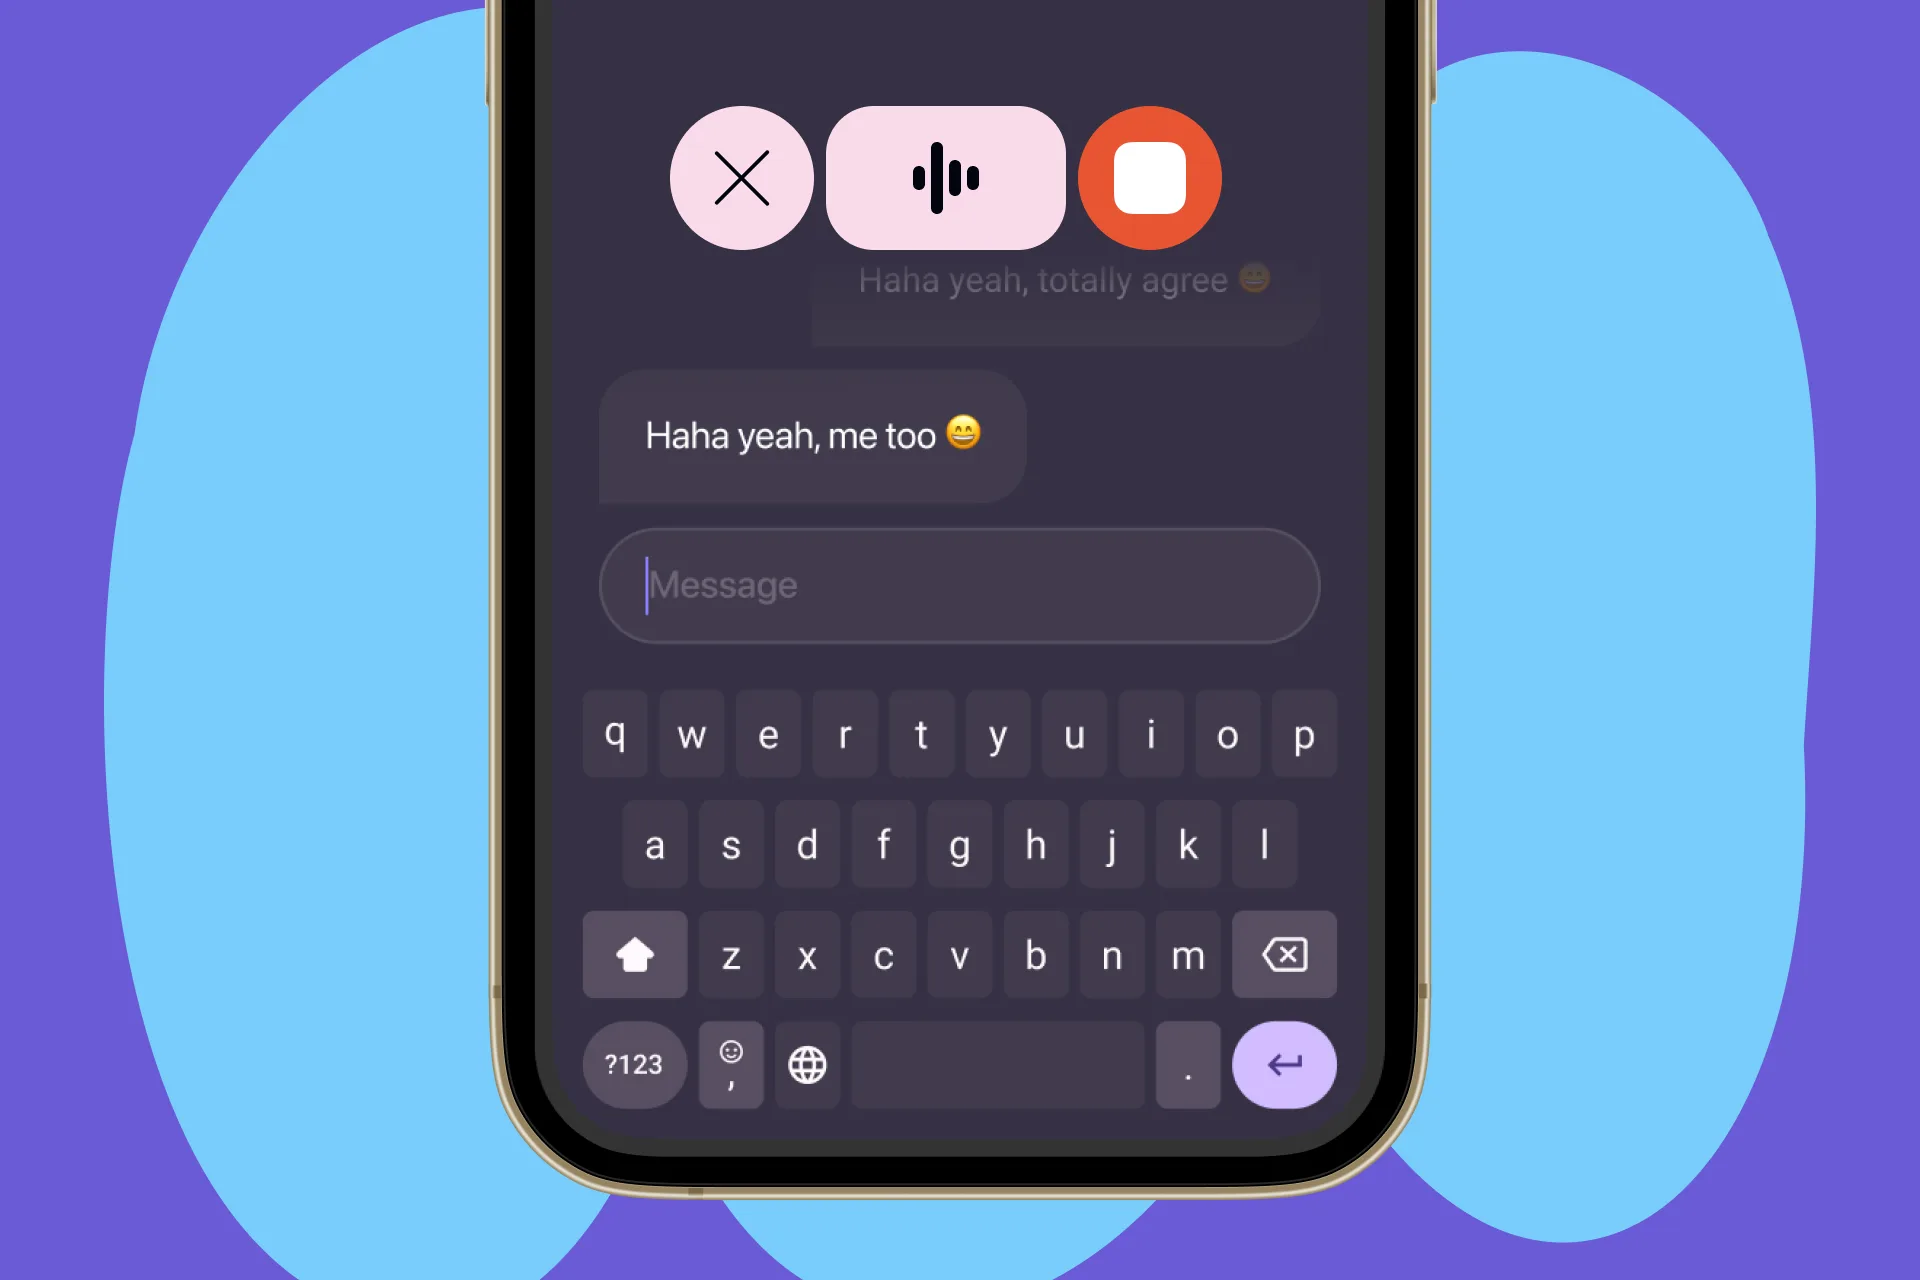
We brought Letterly beyond the app.
Now, with the Letterly Dictation Bubble, you can dictate wherever you already write on your Android phone, without opening Letterly every time.
Set up the Bubble once, then use your voice in Messages, Gmail, Notes, WhatsApp, ChatGPT, and more. Place your cursor in a text field, tap the Bubble, and start speaking. Letterly will turn your speech into clean, ready-to-use text and insert it right where you need it.
You can use it to write messages faster, turn messy thoughts into clear notes, draft emails on the go, or quickly capture ideas before you forget them.
Let’s get started 👇
Set up the Dictation Bubble
When you open the app, you’ll see a Letterly Dictation banner on the Home screen. Tap Set up to get started.
If you previously tapped Later, open Settings → Dictation, tap Set up, and complete the setup from there.
You’ll need to grant two permissions:
- Display over other apps, so the Bubble can appear while you use other apps.
- Accessibility, so Letterly can detect the active text field and insert your dictated text there.
The steps are explained below. 👇
1. Allow the Bubble to appear over other apps
On the setup screen, tap Continue next to Show the Dictation Bubble.
Tap Open Settings.
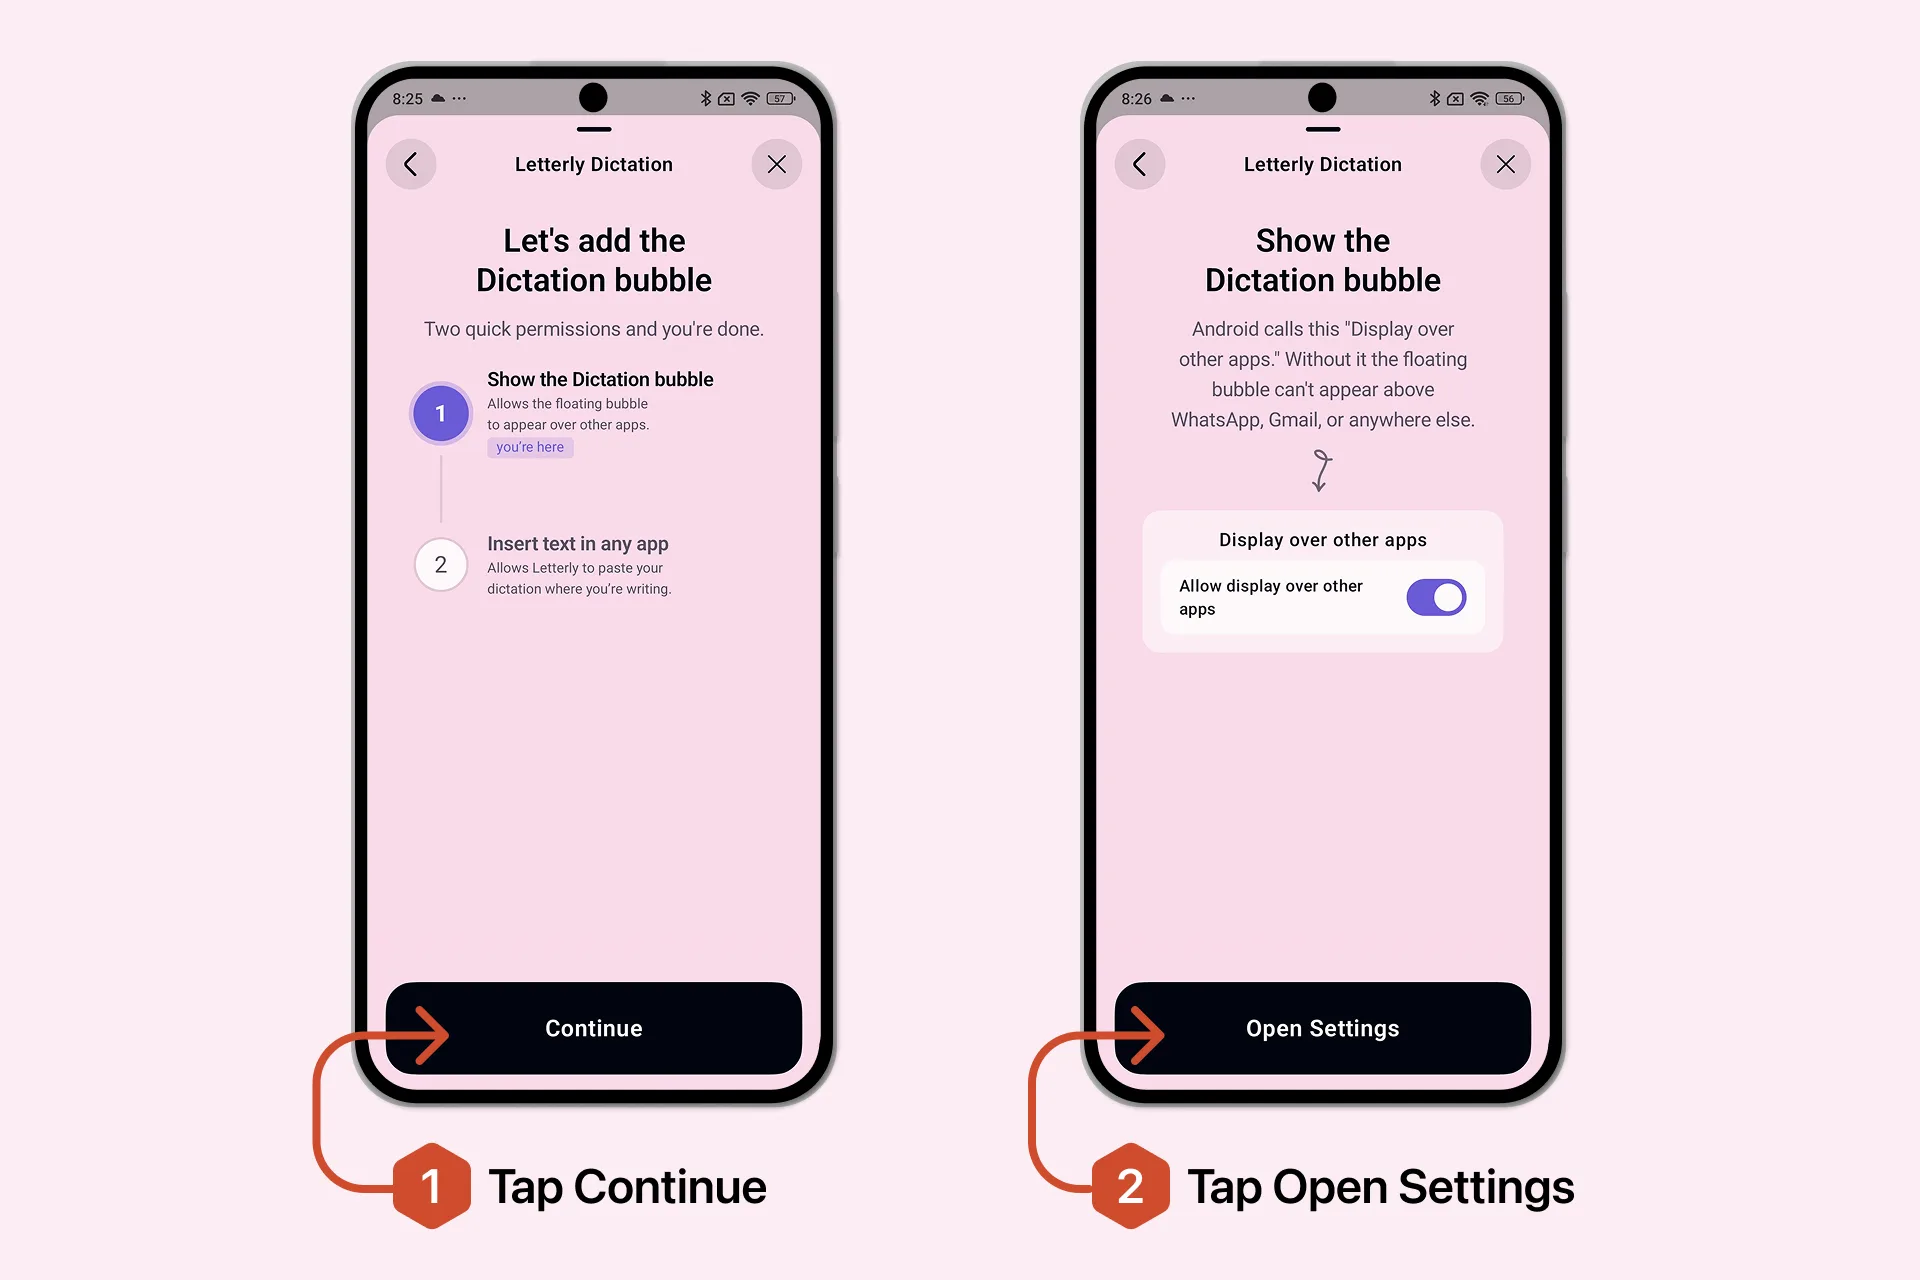
Android will open the Display over other apps settings.
Depending on your device, you may first see a list of apps:
- Find and tap Letterly.
- Turn on Allow display over other apps.
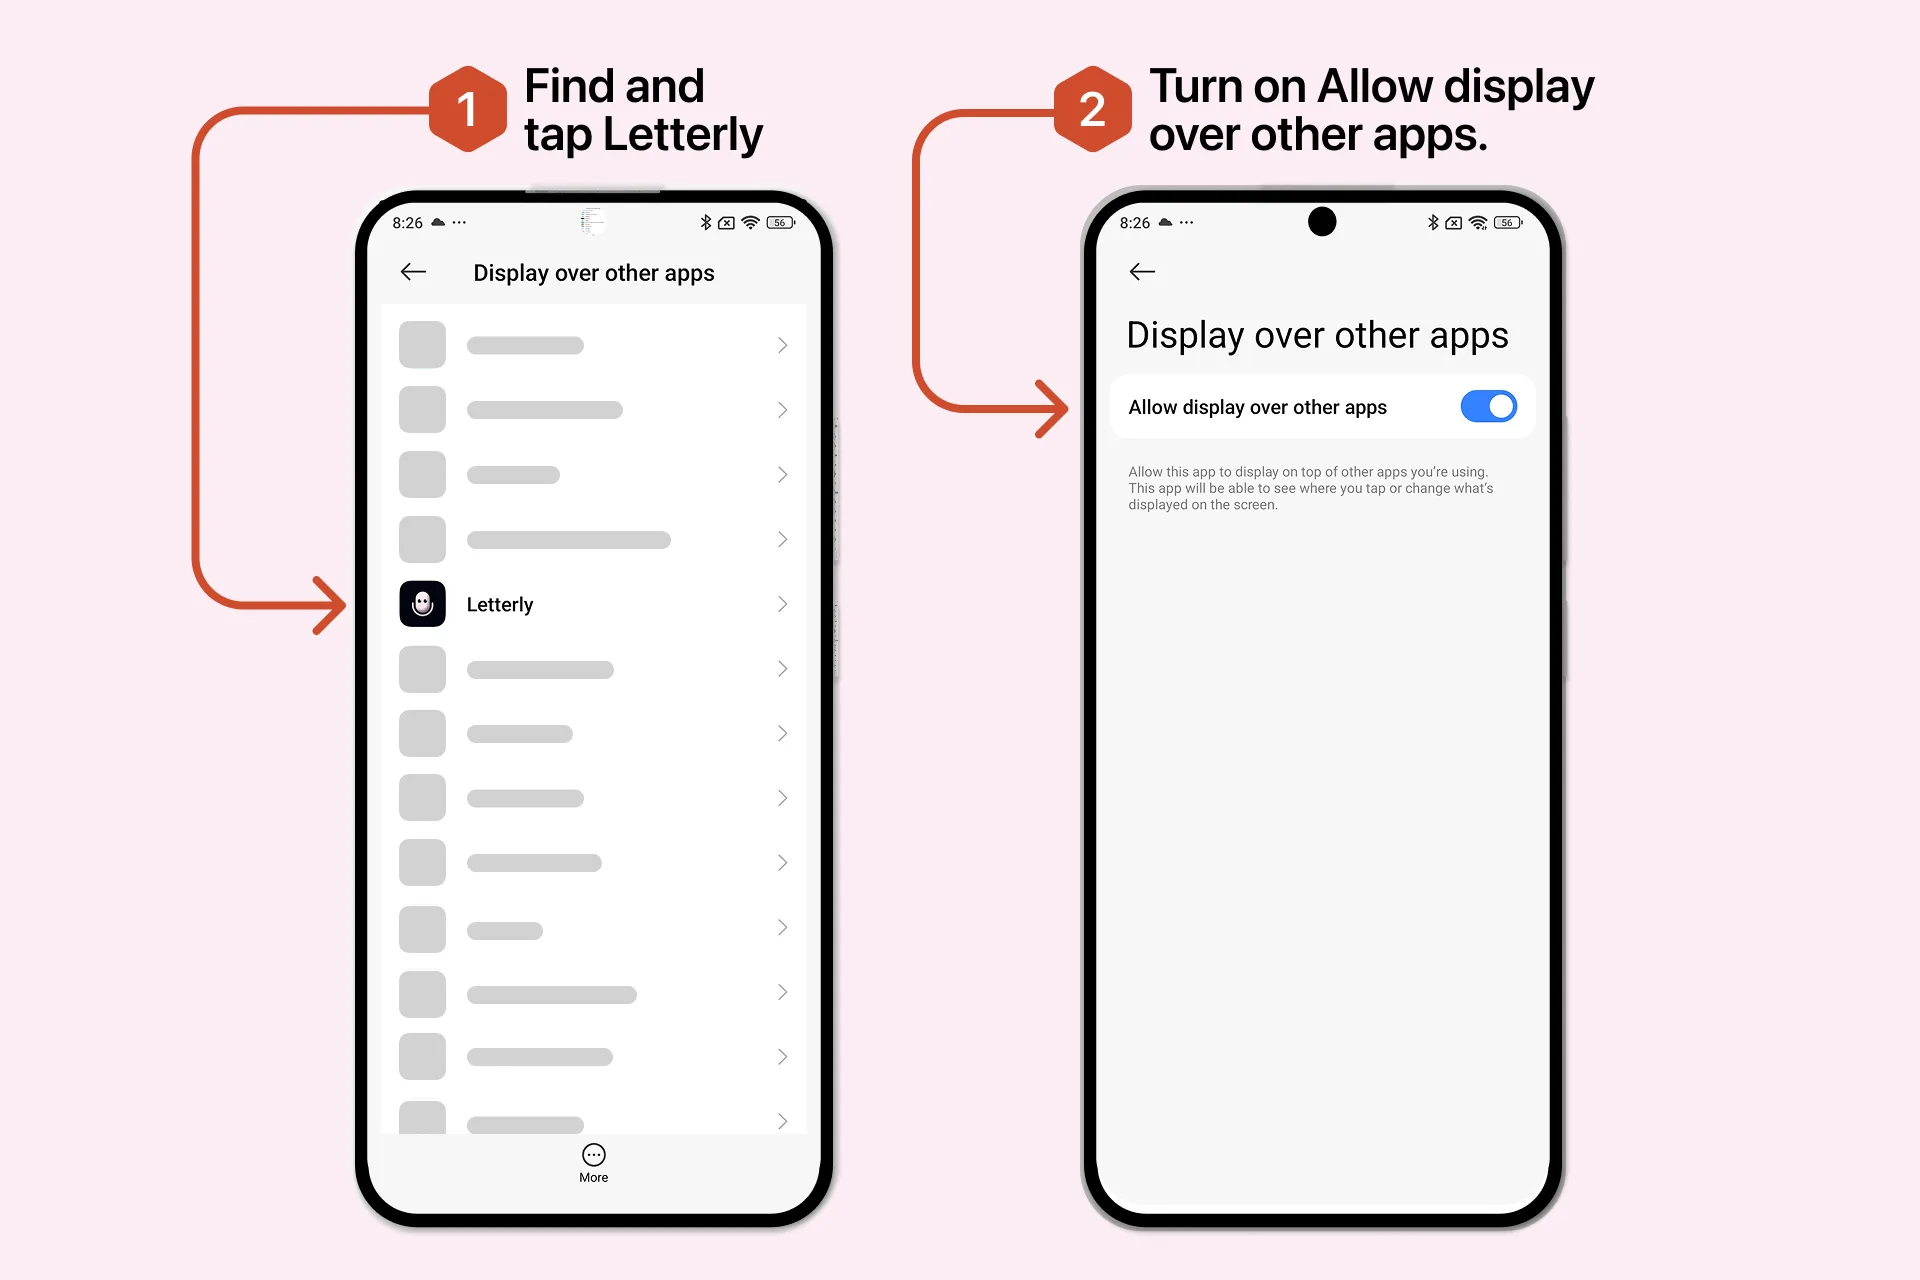
After enabling the permission, return to Letterly to continue the setup.
2. Allow Letterly to insert text
The second permission lets Letterly find the text field where you’re writing and insert your finished Dictation there.
Tap Open Settings next to Insert text in any app.
Before opening your Android settings, Letterly will explain how it uses Accessibility Services. Review the information and tap Continue.
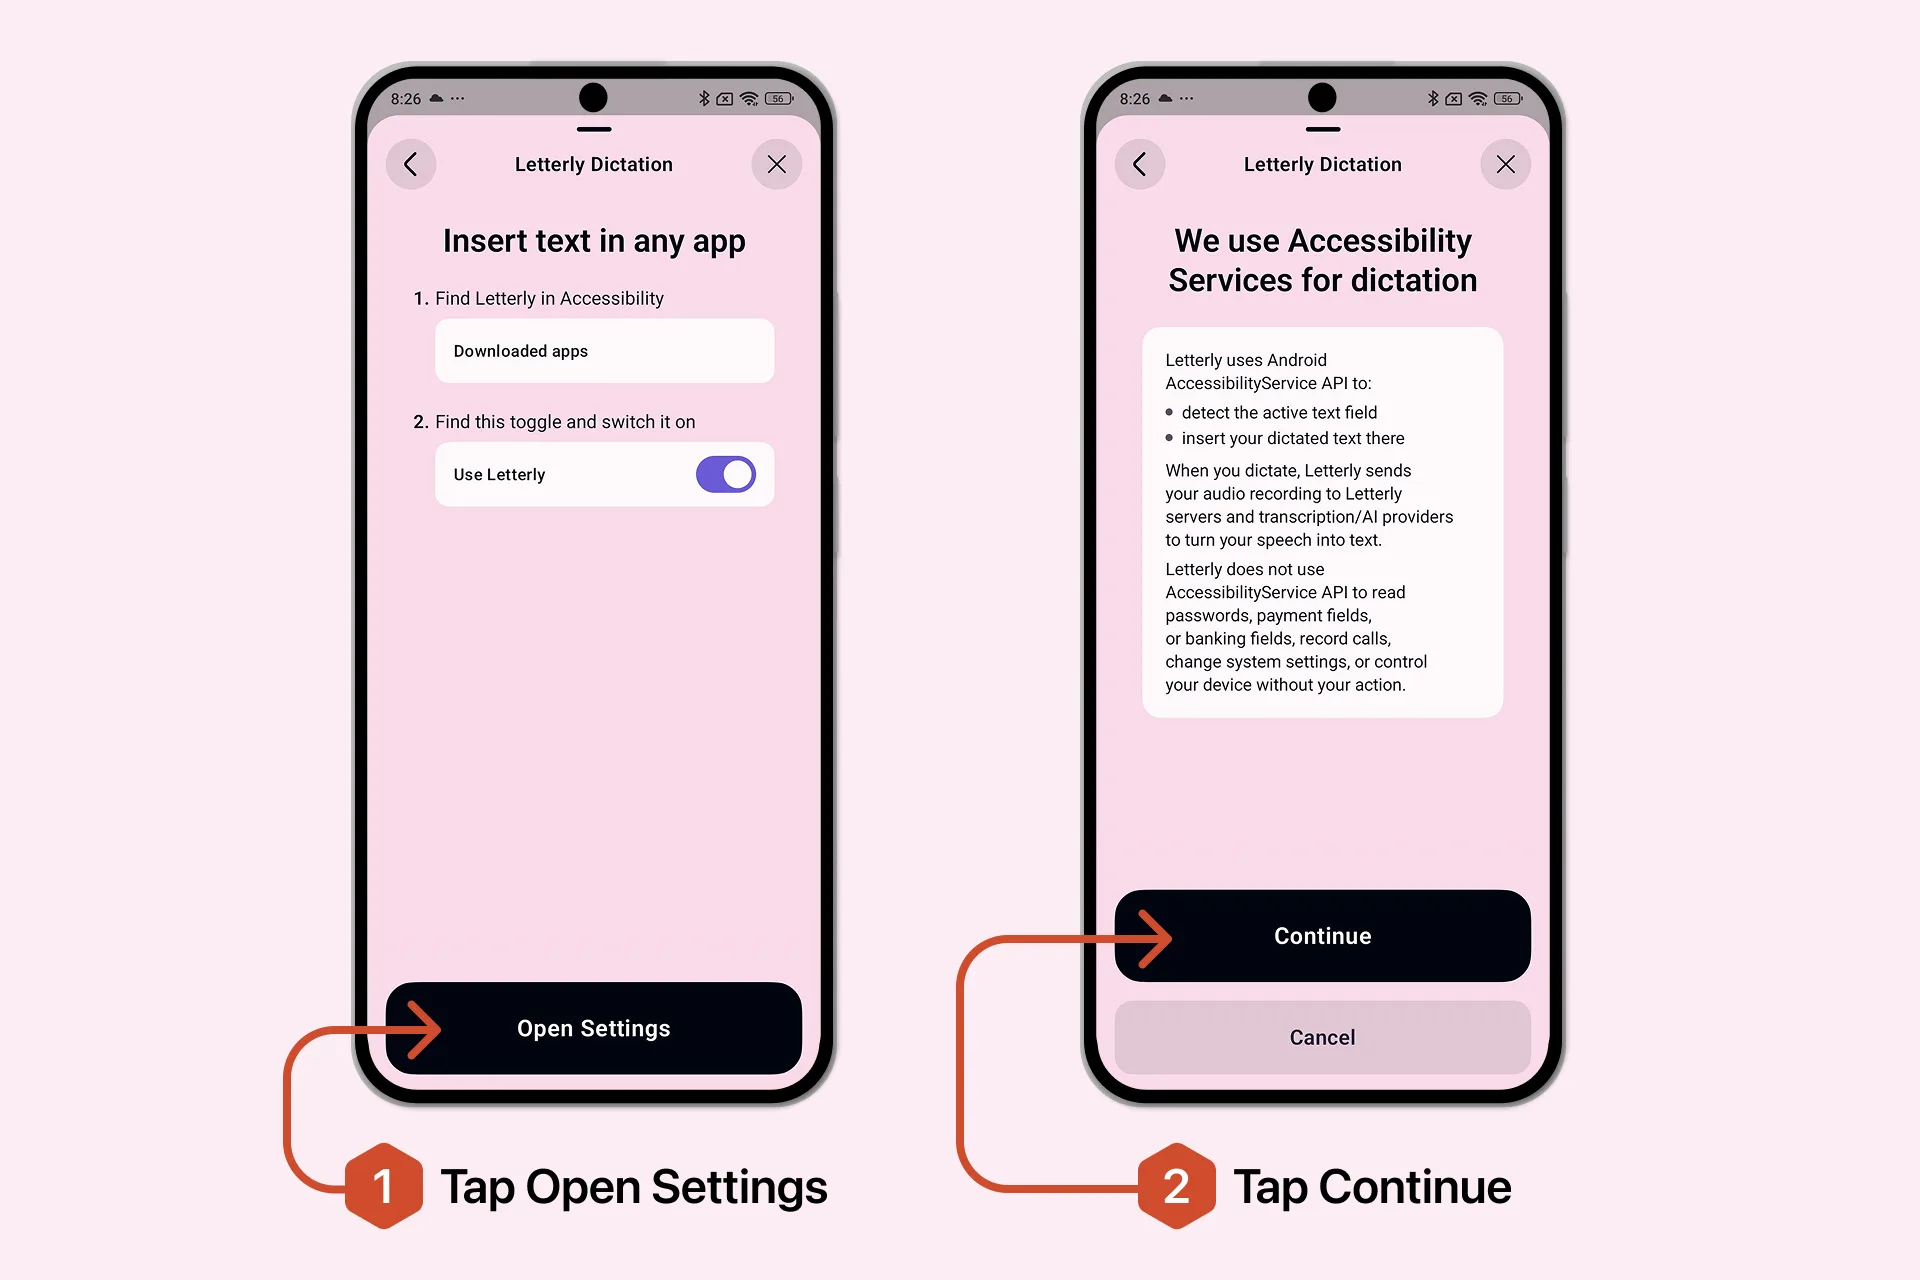
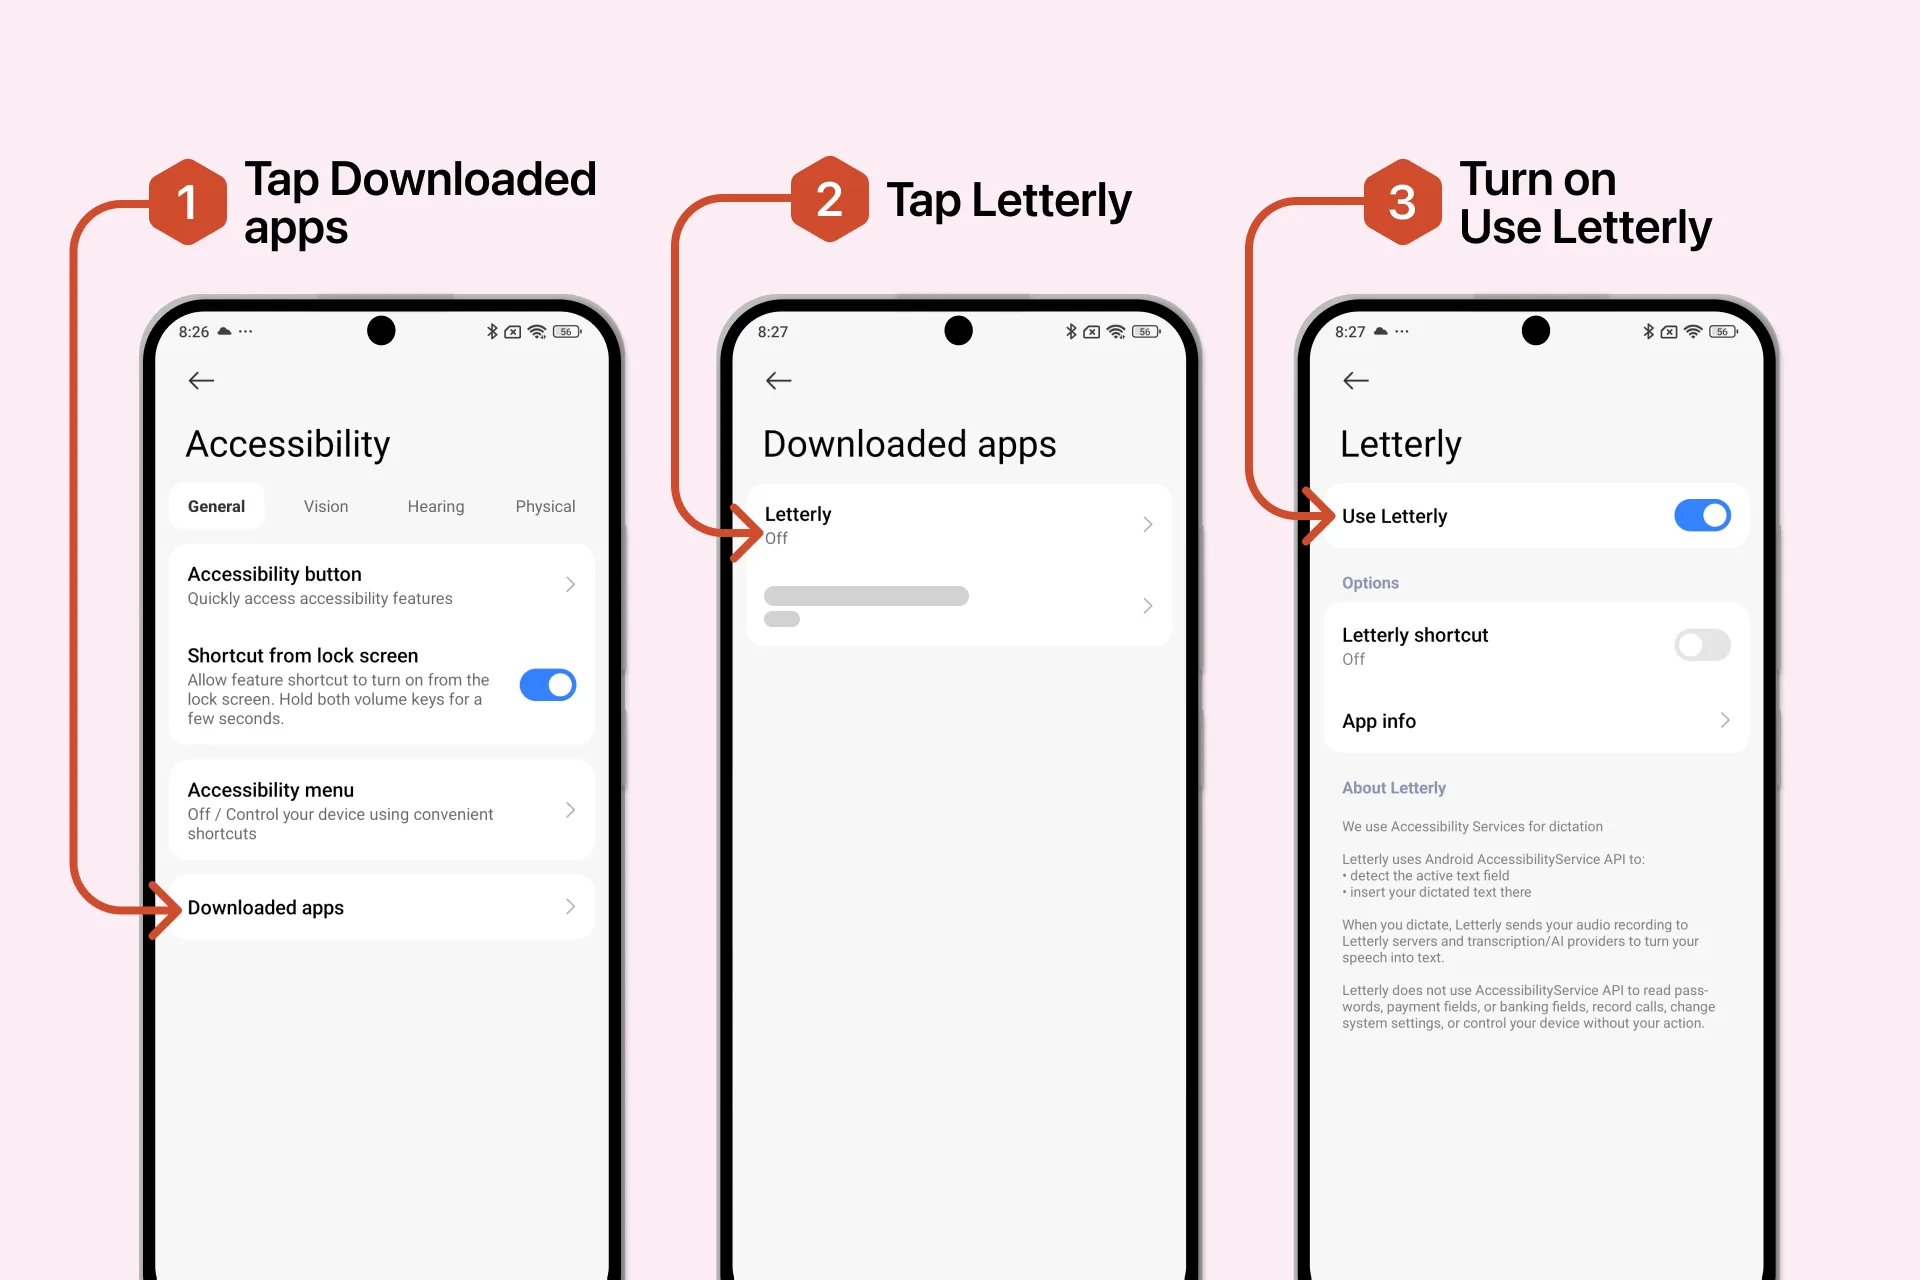
Android will open the Accessibility settings.
The exact menu names may vary depending on your device. On some phones, follow these steps:
- Tap Downloaded apps.
- Tap Letterly.
- Turn on Use Letterly.
3. Confirm the Android warning
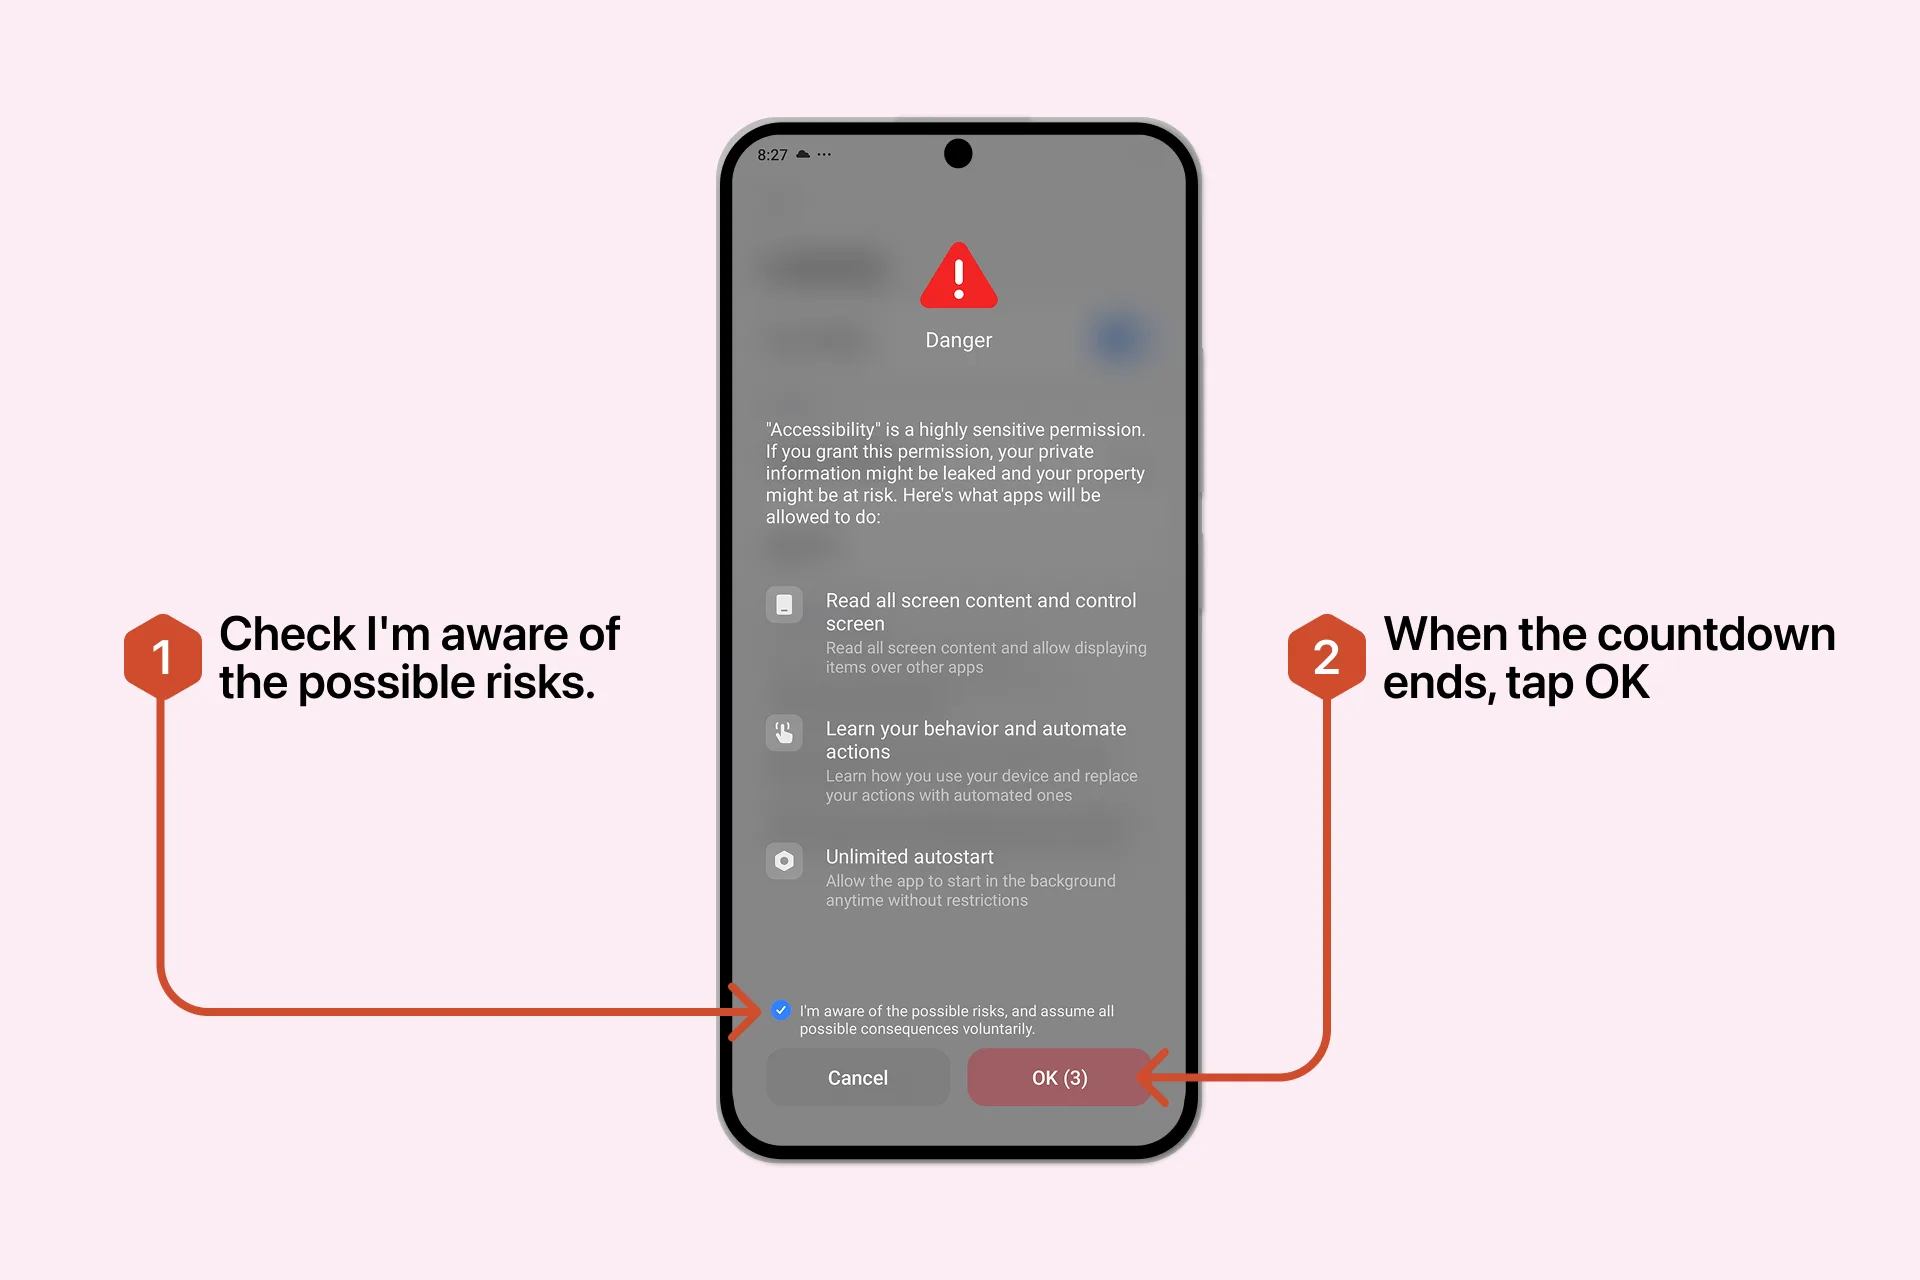
Some Android devices show an additional system warning because Accessibility is considered a sensitive permission.
To continue:
- Wait for the countdown to finish, if one appears.
- Select I’m aware of the possible risks.
- Tap OK.
After enabling the permission, return to Letterly.
The setup is now complete, and the Dictation Bubble will appear on your screen. You can move it to any convenient position by pressing and holding the Letterly Bubble, then dragging it wherever you want on the screen.
That’s it for the basics.
Now let’s learn how to use the Dictation Bubble. 👇
Use the Dictation Bubble
Once the Bubble is set up, you can dictate in most apps on your Android phone.
1. Select where the text should appear
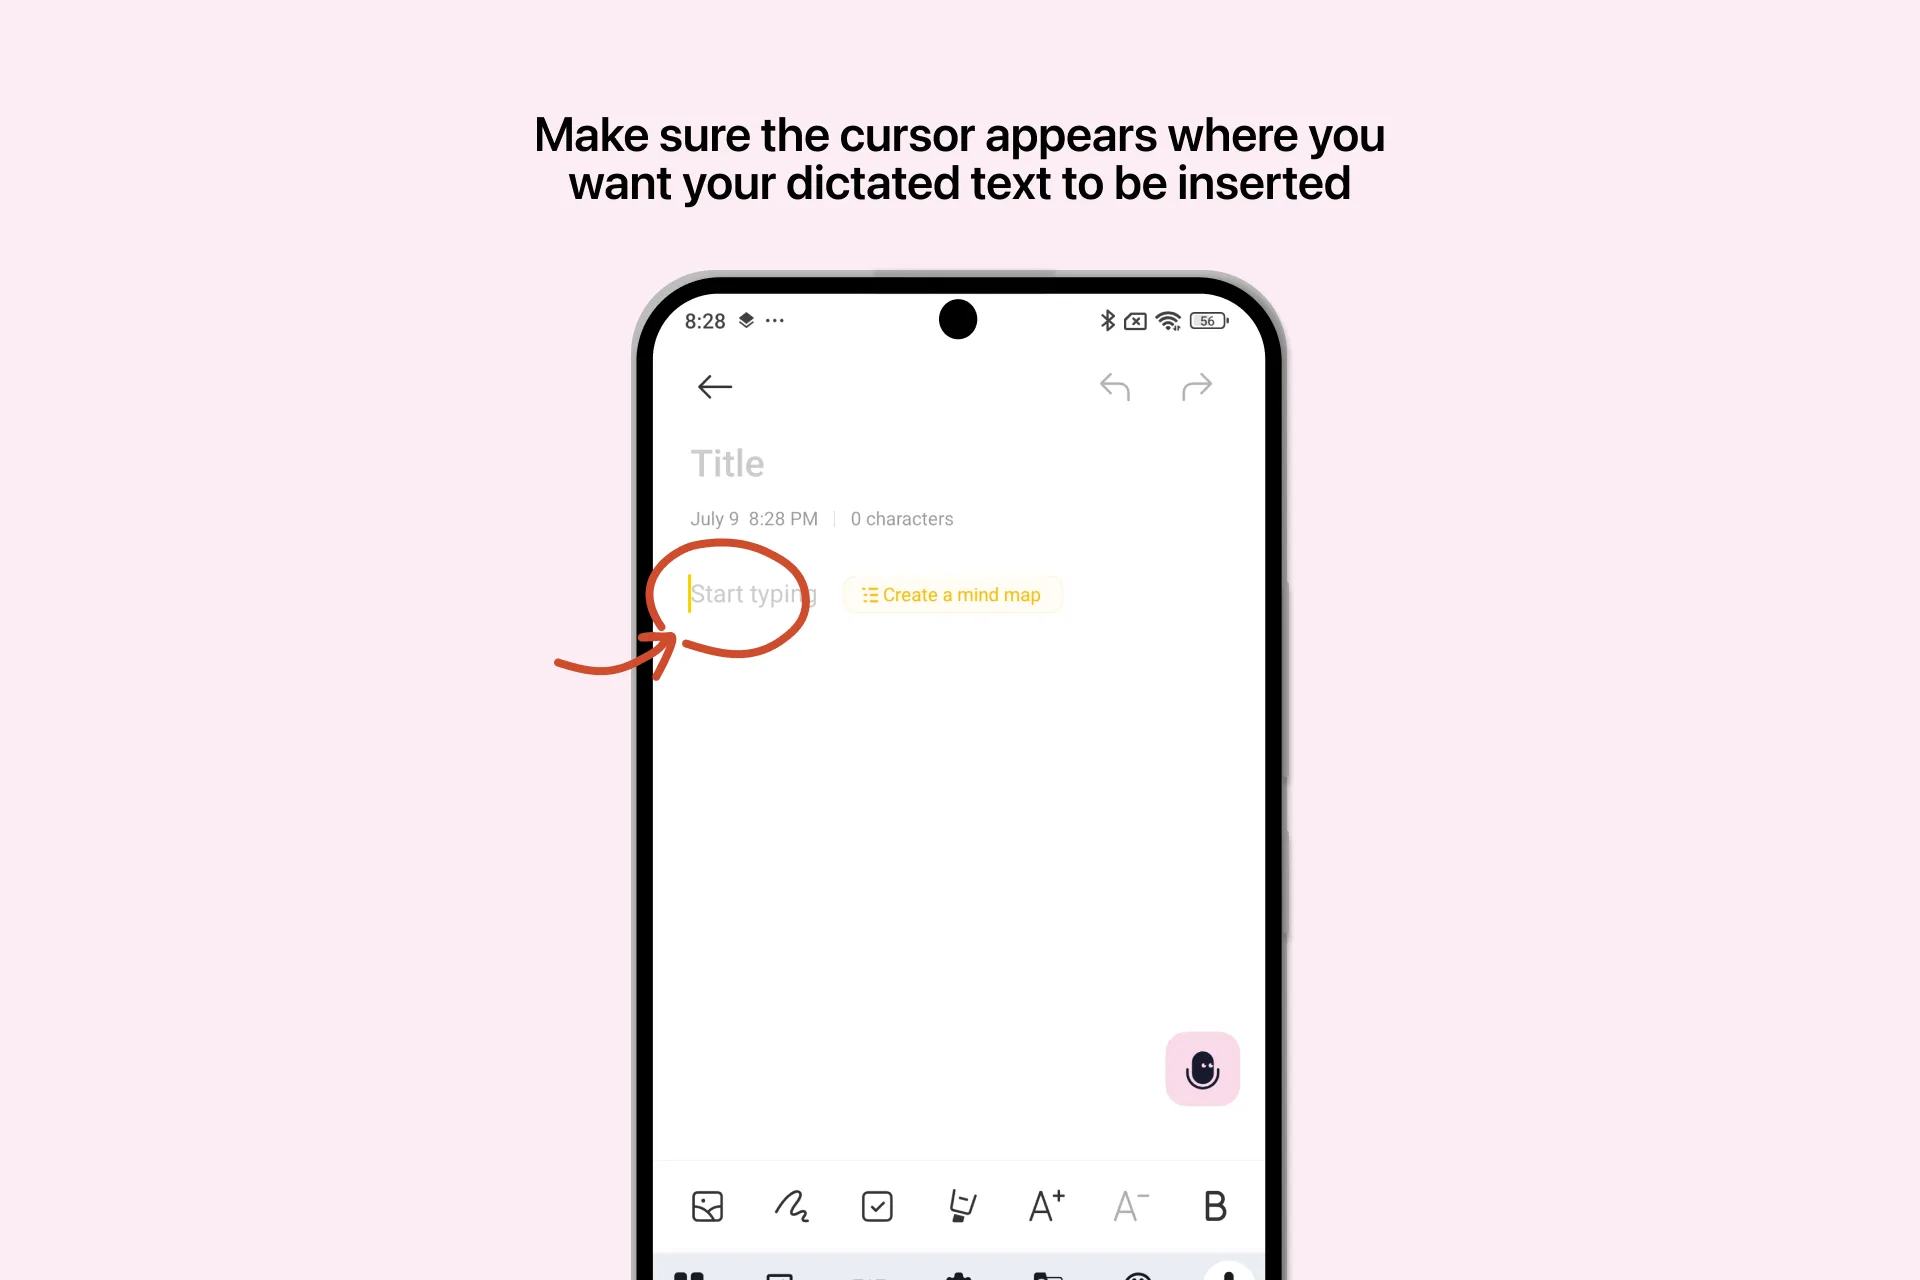
Open the app where you want to write and tap the text field to place your cursor.
For example, you can place the cursor in a message, an email, a note, a search field, and more.
2. Start dictating
Tap the Letterly Bubble to start recording.
Recording begins immediately, so you can start speaking right away.
While Letterly is recording, you’ll see these controls:
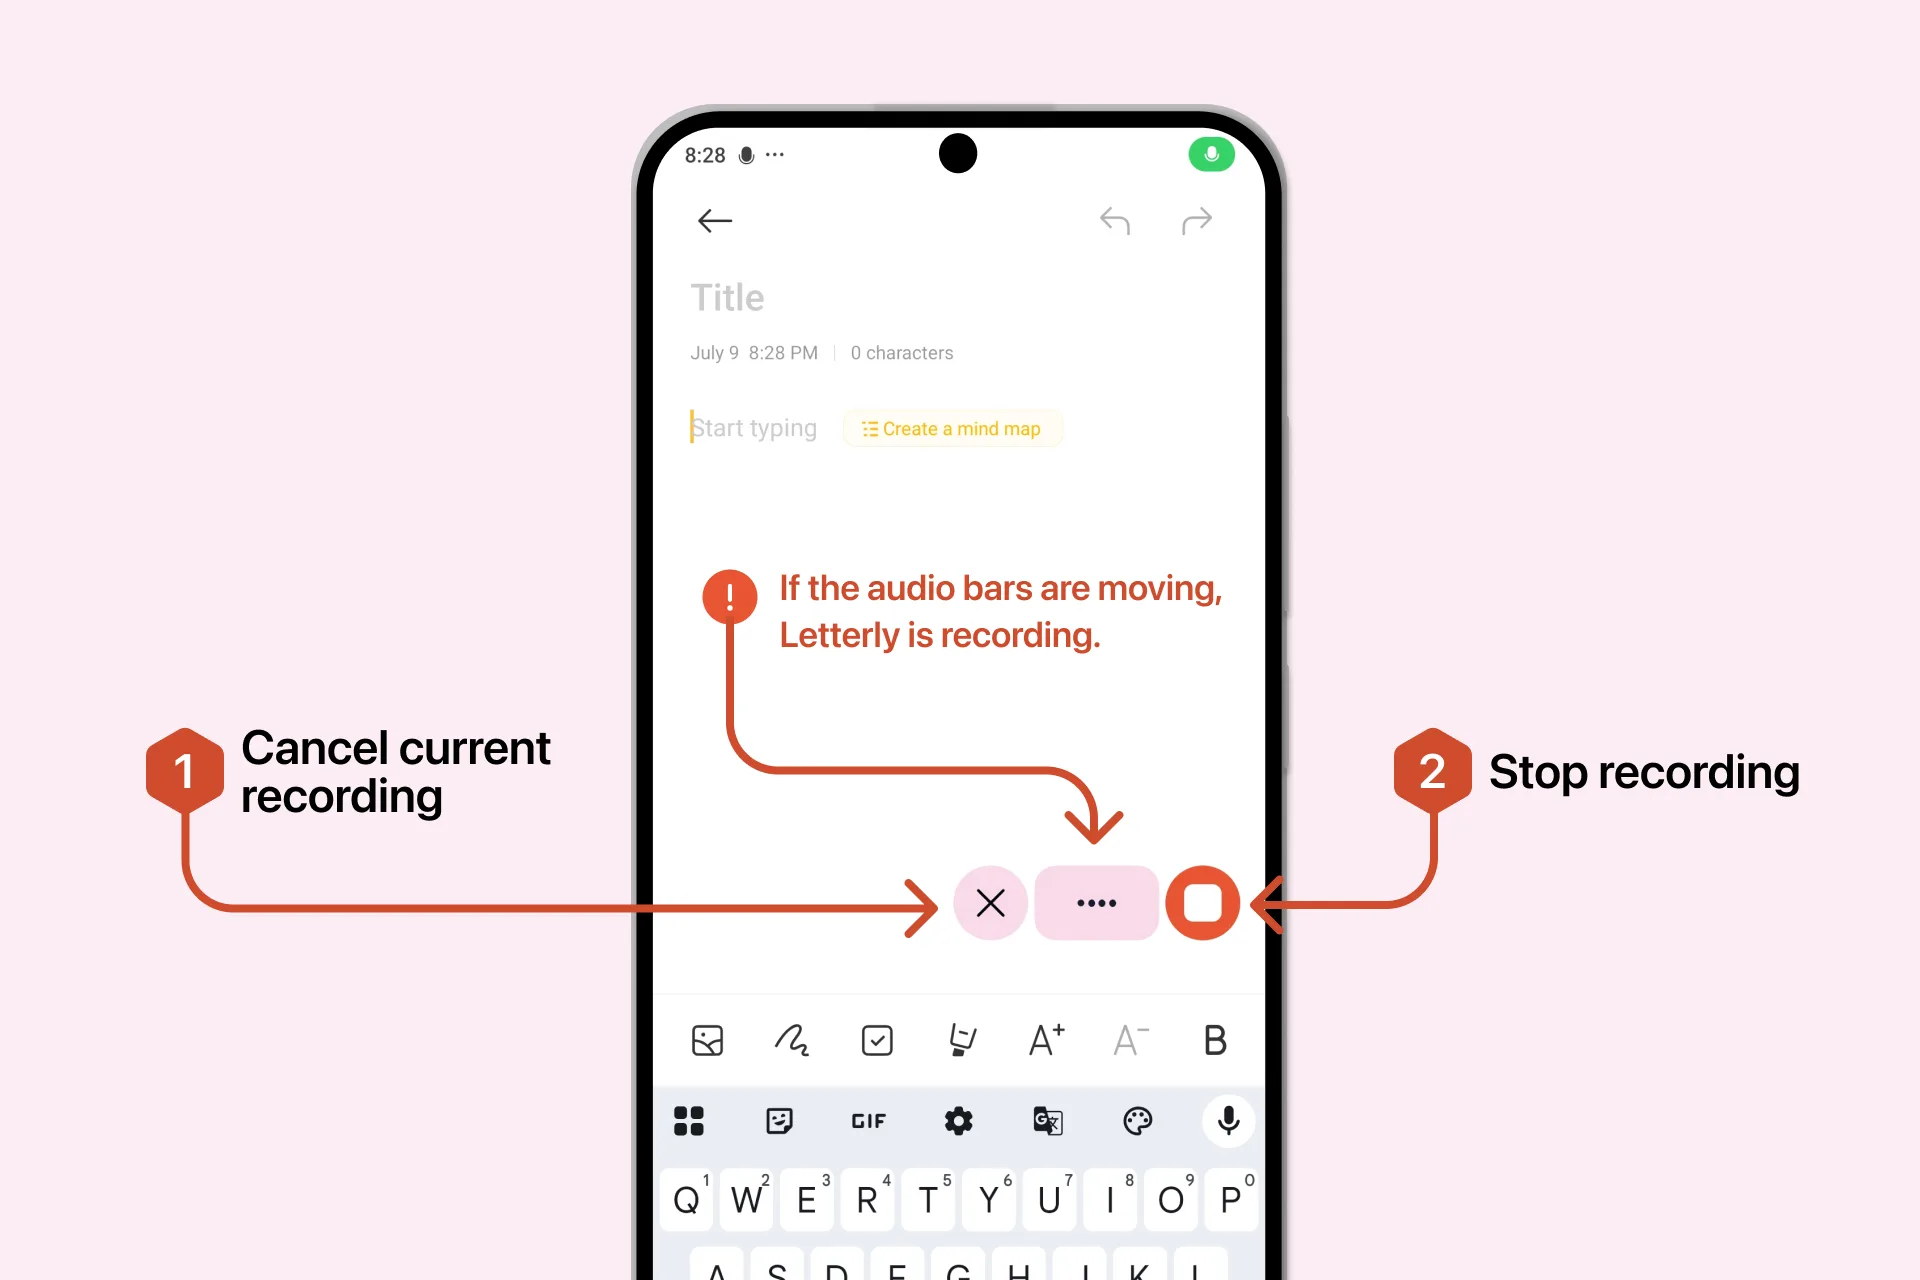
- Cancel current recording: tap X to cancel and discard the current recording.
- Stop recording: tap the red button to finish recording and process your text. After you tap Stop, Letterly processes your speech and inserts the finished text into the active text field.
Keep the app and text field open while Letterly processes your Dictation. This helps Letterly insert the finished text in the correct place.
3. Temporarily hide the Bubble
When you do not need the Bubble, drag it to the Snooze area at the bottom of the screen.
The Bubble will disappear for 10 minutes and return automatically.
To bring it back sooner, unlock your phone and shake it.
Work with Dictation History
Letterly saves your completed dictations in History, so you can return to them later.
To open History, go to Letterly → Settings → History.
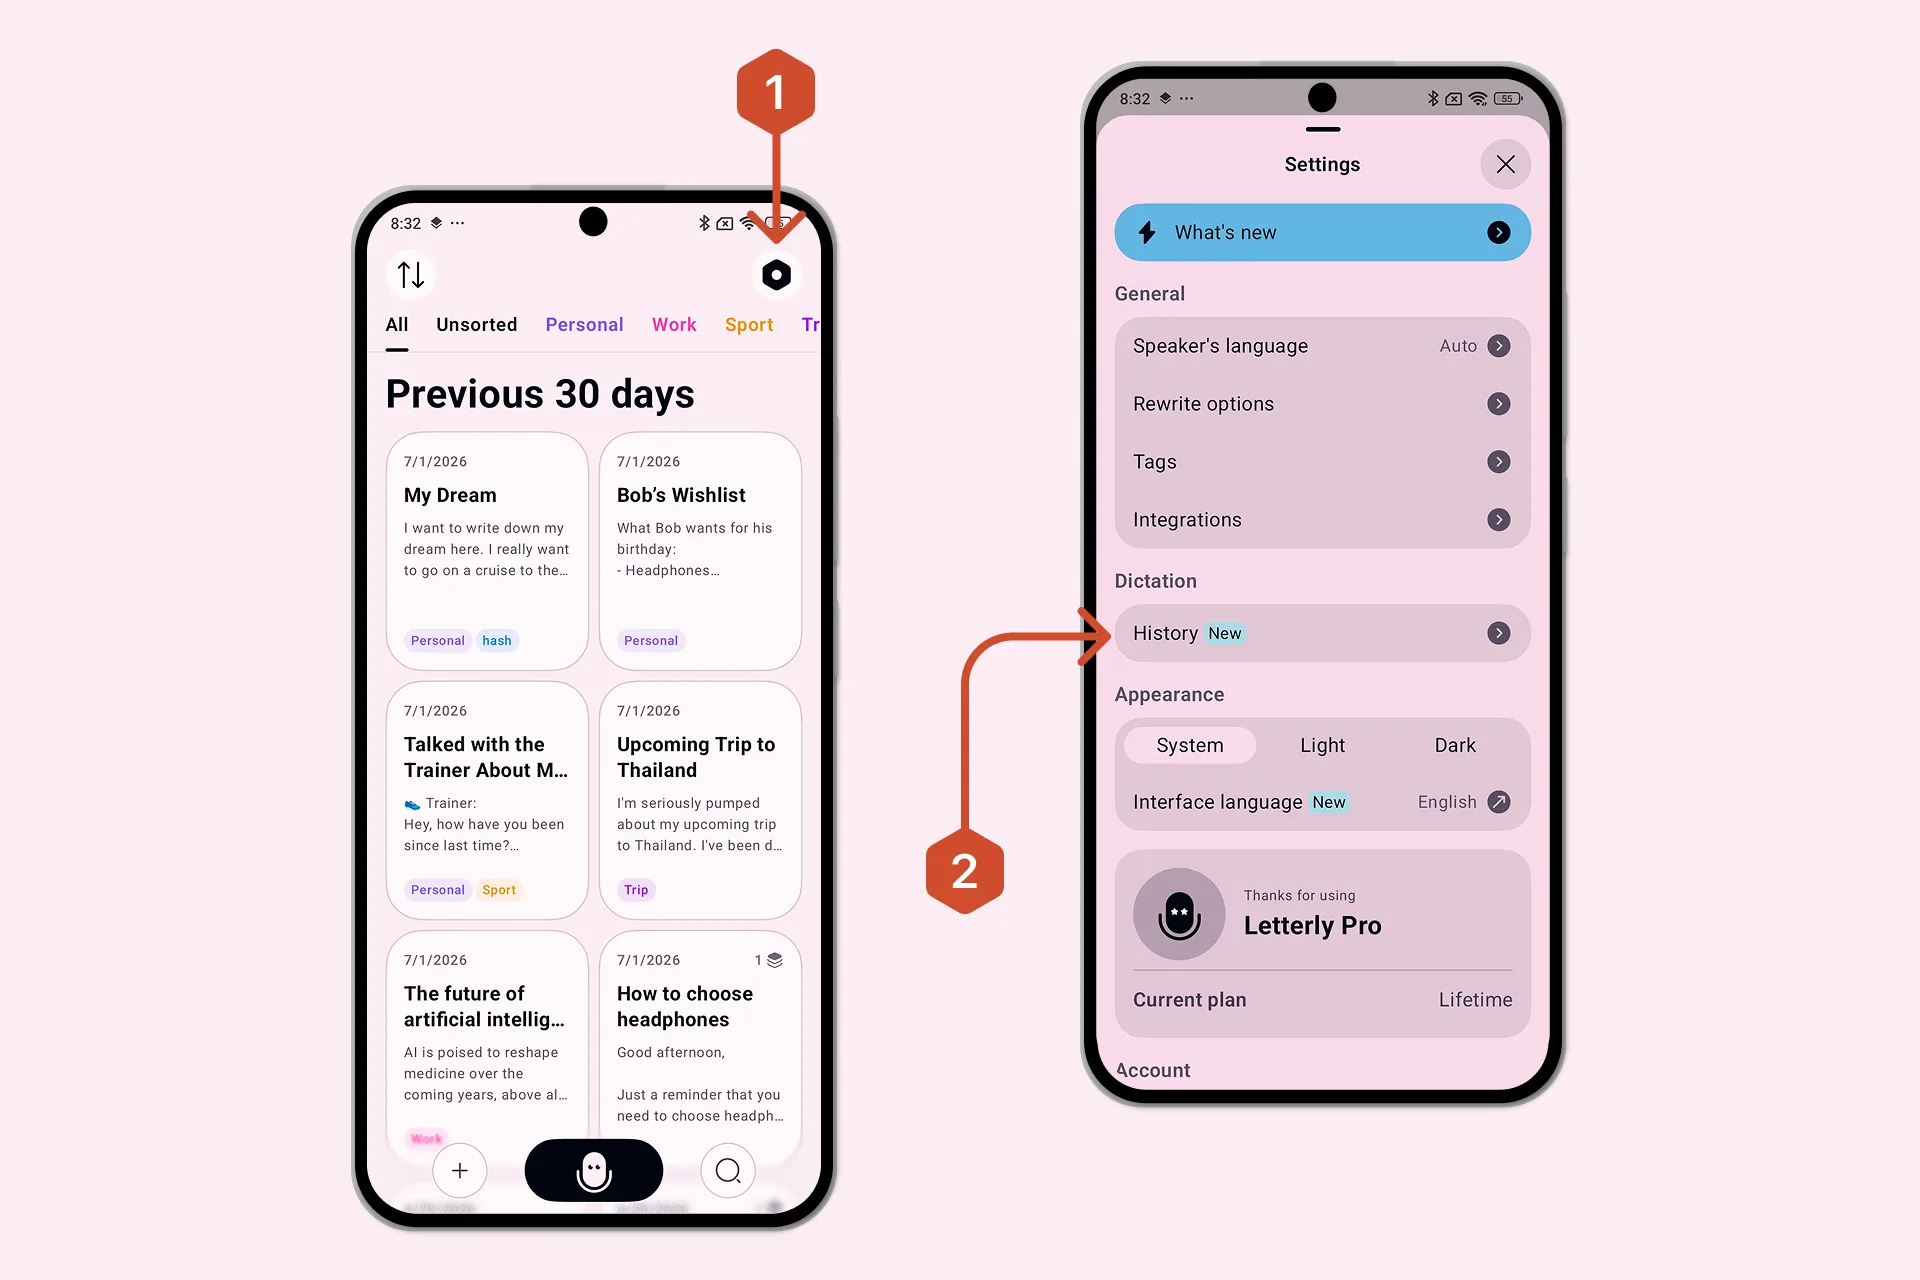
Your dictations are grouped by date, just like notes in the Letterly app.
History is especially useful when:
- you started Dictation without placing your cursor in a text field
- you want to copy a previous Dictation again
- you want to save or share the original audio
Actions in History
Press and hold a Dictation or swipe left on it to open the available actions:
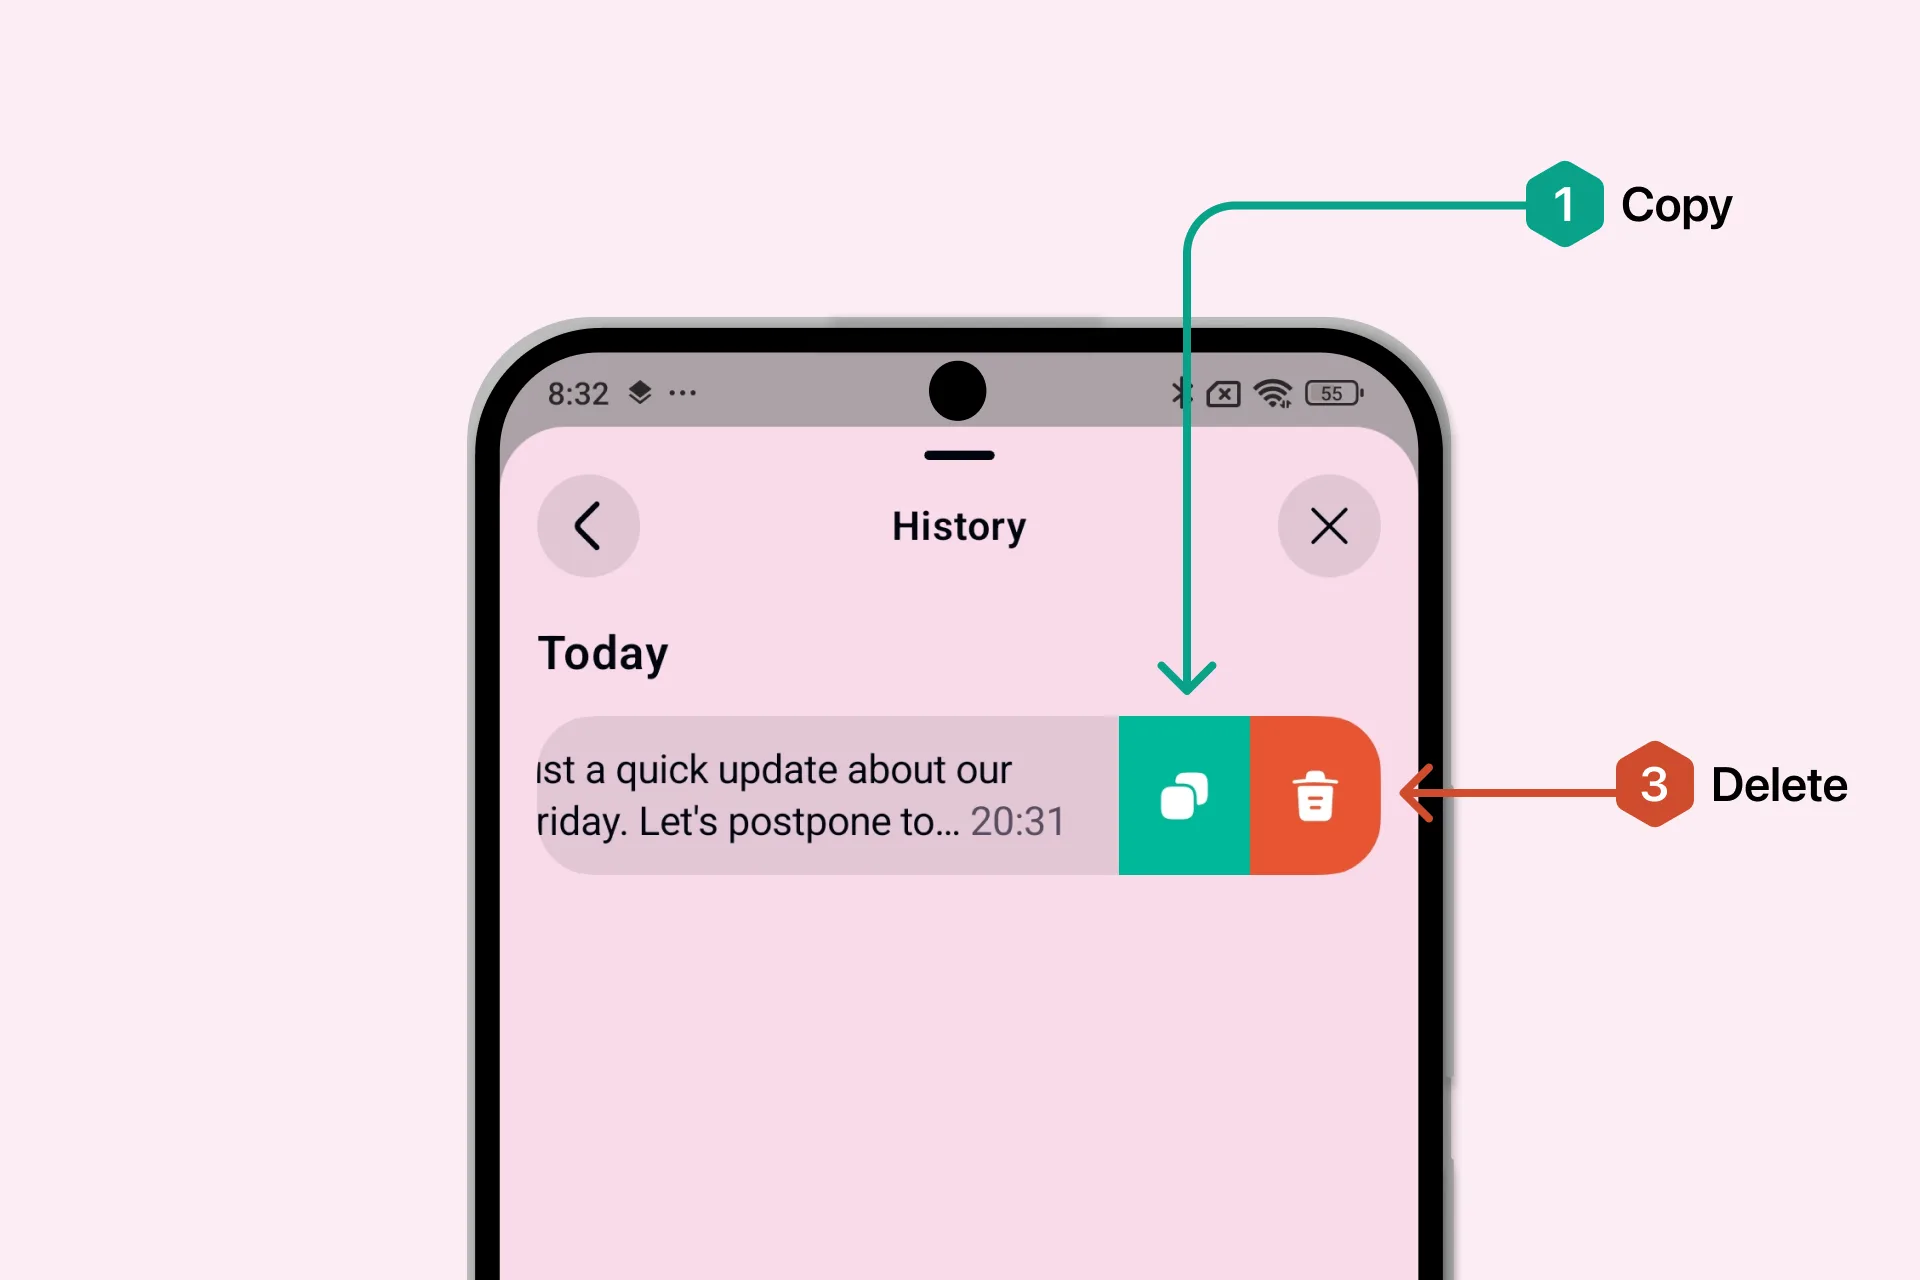
- Copy: copies the Dictation text to your clipboard.
- Delete: permanently removes the Dictation from History.
You did it! 🎉
We hope you enjoy using the Letterly Dictation Bubble and that it makes writing on your Android phone feel faster, easier, and more natural.
Got questions? Email us at hi@letterly.app — we’re happy to help.